Northern Lights Viewing Spots Your Ultimate Guide
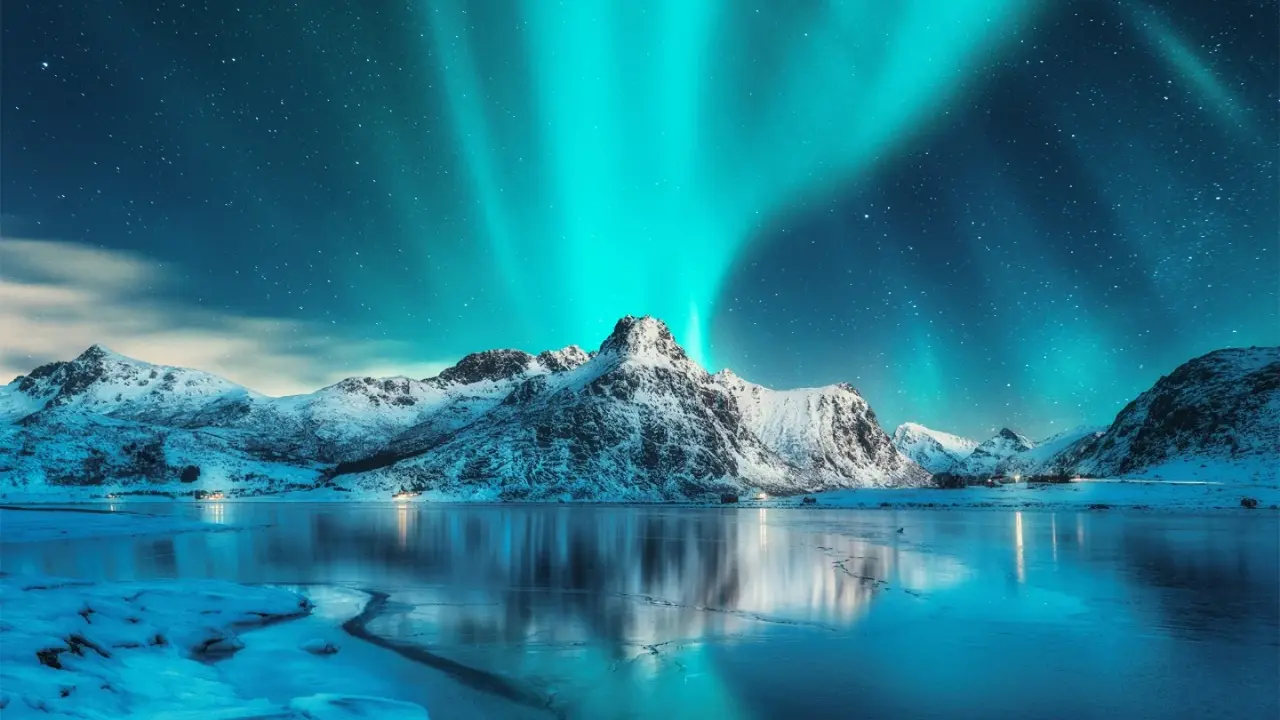
Hey there, fellow adventurers! Ever dreamt of witnessing the sky dance in vibrant hues of green, pink, and purple? That's the magic of the Northern Lights, or Aurora Borealis, and it's truly a bucket-list experience. This guide is all about helping you find the best spots to catch this incredible natural light show, along with some practical tips to make your aurora hunting trip a success. We'll dive into specific locations, what makes them great, and even some gear recommendations to keep you comfy and your camera ready.
Understanding the Aurora Borealis What You Need to Know
Before we jump into destinations, let's quickly chat about what the Northern Lights actually are. Basically, they're caused by charged particles from the sun hitting Earth's atmosphere. When these particles collide with gases like oxygen and nitrogen, they release energy in the form of light, creating those stunning colors we see. The best time to see them is usually during the dark winter months, from late August to April, when the nights are long and clear. You'll also want to keep an eye on the 'KP index,' which is a measure of geomagnetic activity. A higher KP index means a stronger aurora display.
Top Northern Lights Destinations Where to Go
Alright, let's get to the good stuff – where exactly should you go to maximize your chances of seeing the aurora? Here are some of the absolute best places, known for their dark skies and frequent displays:
Tromsø Norway The Arctic Capital
Tromsø, often called the 'Gateway to the Arctic,' is a fantastic choice. It's located well within the Arctic Circle, meaning it gets long periods of darkness during winter, which is perfect for aurora viewing. The city itself is charming, with plenty of activities to keep you busy during the day, like dog sledding or whale watching. From Tromsø, you can join organized aurora tours that take you away from city lights to even darker spots. The infrastructure here is excellent, with good flight connections and a range of accommodation options.
Abisko Sweden A Scientific Choice
Abisko National Park in Sweden is renowned for its 'Blue Hole,' a patch of sky that often remains clear even when surrounding areas are cloudy. This unique microclimate makes it one of the most reliable places on Earth to see the Northern Lights. The Aurora Sky Station, accessible by chairlift, offers an elevated viewing experience with minimal light pollution. It's a bit more remote than Tromsø, but if your primary goal is aurora hunting, Abisko is a top contender. They even have scientific equipment to help predict aurora activity.
Reykjavik Iceland Land of Fire and Ice
Iceland is incredibly popular for a reason. It's relatively accessible from North America and Europe, and the entire country offers incredible landscapes that make for stunning aurora backdrops. While Reykjavik has some light pollution, you can easily drive a short distance out of the city to find darker skies. Popular spots include the Golden Circle route, the Snaefellsnes Peninsula, or even just pulling over on a quiet road. Iceland also offers a plethora of other winter activities, from exploring ice caves to soaking in geothermal hot springs, making it a well-rounded winter adventure.
Fairbanks Alaska The American Gem
If you're looking for a North American option, Fairbanks, Alaska, is hard to beat. It sits right under the 'aurora oval,' a band around the magnetic pole where aurora activity is most concentrated. Fairbanks boasts a high success rate for aurora viewing, especially from late August to April. You can join tours that take you to remote cabins or hot springs for viewing, or even just drive a bit outside the city. The University of Alaska Fairbanks also has an excellent aurora forecast website, which is super helpful for planning.
Yellowknife Canada The Diamond City
Yellowknife, in Canada's Northwest Territories, is another prime location. Its flat, open landscape and clear, dry air contribute to excellent viewing conditions. Like Fairbanks, it's directly under the aurora oval. There are several dedicated aurora viewing camps and lodges around Yellowknife that offer comfortable, heated spaces to wait for the lights, often with hot drinks and snacks. It's a truly immersive experience, and the local indigenous culture adds another layer of richness to your trip.
Rovaniemi Finland Santa's Hometown
Rovaniemi, the official hometown of Santa Claus, offers a magical winter experience alongside aurora hunting. While it's a bit further south than some other prime spots, it still offers good chances, especially if you venture outside the city lights. The unique appeal here is combining aurora viewing with festive activities, making it a great option for families. You can stay in glass igloos or treehouses for a unique viewing experience right from your bed.
Essential Gear for Aurora Hunting Stay Warm and Ready
Chasing the Northern Lights often means spending hours outdoors in freezing temperatures. Being prepared with the right gear is crucial for comfort and enjoyment. Here’s what you’ll definitely need:
Layering System The Key to Warmth
Forget your fashion sense; layering is king here. Think three main layers:
- Base Layer: This is your first line of defense against the cold. It should be moisture-wicking to keep sweat away from your skin. Merino wool or synthetic materials are excellent choices.
- Mid Layer: This provides insulation. Fleece jackets, down vests, or synthetic puff jackets work well. You might even want two mid-layers if it's super cold.
- Outer Layer: Your shell. This needs to be waterproof and windproof to protect you from the elements. A good quality ski jacket and pants are perfect.
Footwear and Hand Protection Don't Skimp
Your extremities are the first to get cold. Invest in:
- Insulated Winter Boots: Look for boots rated for extreme cold (e.g., -30°C or -40°C). Make sure they're waterproof and have good grip. Brands like Sorel, Baffin, and Columbia are popular.
- Wool Socks: Wear at least two pairs – a thin liner sock and a thick wool sock over it.
- Gloves or Mittens: A thin pair of liner gloves (touchscreen compatible is a bonus!) under a thick, insulated, waterproof pair of mittens. Mittens are generally warmer than gloves.
Headwear and Accessories Crucial Details
- Warm Hat: A wool or fleece hat that covers your ears.
- Neck Gaiter or Balaclava: To protect your neck and face from the biting wind.
- Hand Warmers and Toe Warmers: These little packets are lifesavers! Stick them in your gloves and boots for extra warmth.
- Headlamp: Essential for navigating in the dark. Choose one with a red light setting to preserve your night vision and not disturb others.
Photography Gear Capturing the Magic
You'll definitely want to capture the aurora, and for that, you'll need some specific camera gear. Your phone might get a decent shot, but a dedicated camera will give you much better results.
Camera Body and Lens Low Light Performance
- DSLR or Mirrorless Camera: Any modern DSLR or mirrorless camera will work, as long as it allows for manual settings (shutter speed, aperture, ISO). Brands like Sony, Canon, and Nikon are excellent.
- Wide-Angle Lens: This is crucial. You want a lens with a wide aperture (low f-number, like f/2.8 or wider) to let in as much light as possible. A focal length between 14mm and 24mm (on a full-frame sensor) is ideal for capturing the vastness of the sky.
Essential Accessories Stability and Power
- Sturdy Tripod: Absolutely non-negotiable. You'll be taking long exposure shots, so your camera needs to be perfectly still. Look for one that's stable in windy conditions.
- Remote Shutter Release: This prevents camera shake when you press the shutter button. A wired or wireless remote is fine.
- Extra Batteries: Cold weather drains batteries incredibly fast. Bring at least two or three fully charged spares and keep them warm in an inside pocket until you need them.
- Lens Cloth: For wiping off condensation or snow.
Recommended Camera Gear Products
Here are a few product recommendations that are popular among aurora photographers:
Camera Bodies
- Sony Alpha a7 III: A fantastic full-frame mirrorless camera known for its excellent low-light performance and dynamic range. It's a bit of an investment, usually around $1,700 - $2,000 for the body only.
- Nikon D750: A solid full-frame DSLR that's also great in low light. You can often find it for around $1,500 - $1,800.
- Canon EOS R: Canon's full-frame mirrorless option, offering great image quality. Price point is similar to the Sony a7 III.
- Entry-Level Option: Nikon D3500 or Canon Rebel T7: If you're on a tighter budget, these APS-C sensor cameras can still capture decent aurora shots, especially when paired with a good wide-angle lens. They typically cost $500 - $700 with a kit lens.
Lenses (Wide-Angle, Fast Aperture)
- Samyang/Rokinon 14mm f/2.8: This is a manual focus lens, but it's incredibly popular for aurora photography due to its wide field of view and fast aperture, and it's very affordable, often around $300 - $400. Great value for money.
- Sigma 14-24mm f/2.8 Art: A premium zoom lens offering excellent sharpness and a fast aperture. More expensive, typically $1,200 - $1,500.
- Tamron 17-28mm f/2.8 Di III RXD (for Sony E-mount): A lighter and more compact option for Sony mirrorless users, around $900.
Tripods
- Manfrotto Befree Advanced: A popular choice for travelers, relatively lightweight yet sturdy. Around $150 - $200.
- Peak Design Travel Tripod: Super compact and well-designed, but pricier at around $350.
- Budget Option: Amazon Basics Lightweight Tripod: For casual use, it can work, but might struggle in windy conditions. Around $20 - $30.
Photography Settings for Aurora Borealis Get the Shot
Once you have your gear, knowing the right settings is key. Here’s a general starting point:
- Manual Mode (M): You need full control.
- Aperture: Set it to the widest possible (lowest f-number), e.g., f/2.8, f/4.
- ISO: Start around ISO 1600 or 3200. Adjust higher (e.g., 6400) if the aurora is faint, but be mindful of noise.
- Shutter Speed: This will vary depending on the aurora's intensity. Start with 10-20 seconds. If the aurora is very bright and moving fast, you might reduce it to 5-8 seconds to avoid blurring. If it's faint, you might go up to 25-30 seconds.
- Focus: Set your lens to manual focus and focus to infinity. If your lens has a focus scale, set it there. Otherwise, focus on a distant bright star or light source during the day, then switch to manual and don't touch it.
- White Balance: Experiment! Auto white balance can be inconsistent. Try 'Daylight' or 'Fluorescent' or set a Kelvin temperature around 3500K-4000K for a cooler look.
Tips for a Successful Aurora Hunt Maximizing Your Chances
Seeing the Northern Lights isn't guaranteed, but you can significantly increase your odds with these tips:
Timing is Everything Plan Your Trip
- Visit During Peak Season: Late August to April offers the longest nights. The absolute darkest months are December, January, and February.
- Check Aurora Forecasts: Websites like NOAA's Space Weather Prediction Center or local aurora forecast apps (e.g., My Aurora Forecast) provide KP index predictions.
- Avoid Full Moon: A bright moon can wash out fainter aurora displays. Check the lunar calendar before you book.
- Stay for Several Nights: The longer you stay, the better your chances. Aim for at least 3-5 nights in an aurora zone.
Location, Location, Location Get Away from Light Pollution
- Go Rural: City lights are your enemy. Drive at least 30-60 minutes outside of any major town or city.
- Find an Open View: Look for a spot with an unobstructed view of the northern horizon. Lakes, open fields, or mountain tops are ideal.
Patience and Persistence The Aurora Hunter's Virtues
- Be Patient: The aurora can appear and disappear quickly. Sometimes you'll wait for hours for a brief show, other times it'll be dancing all night.
- Dress Warmly: We can't stress this enough. If you're cold, you'll give up too soon.
- Stay Up Late: The best displays often happen between 10 PM and 2 AM, but they can appear any time it's dark.
Safety First Be Prepared
- Tell Someone Your Plans: Especially if you're driving to a remote area.
- Charge Your Phone: For emergencies.
- Bring Snacks and Hot Drinks: A thermos of hot chocolate or coffee can make a long wait much more enjoyable.
- Know Your Route: Roads can be icy and dark. Drive carefully.
Beyond the Lights Other Winter Activities
Even if the aurora doesn't show up every night, these destinations offer plenty of other incredible winter experiences:
- Dog Sledding: A thrilling way to explore snowy landscapes.
- Snowmobiling: Fast-paced adventure through forests and over frozen lakes.
- Ice Fishing: A peaceful pastime on frozen bodies of water.
- Reindeer Sleigh Rides: A magical, traditional experience, especially in Lapland.
- Visiting Ice Hotels or Snow Villages: Unique architectural wonders made entirely of ice and snow.
- Cross-Country Skiing or Snowshoeing: Explore serene winter trails at your own pace.
Chasing the Northern Lights is an unforgettable journey. With the right preparation, gear, and a bit of luck, you'll be treated to one of nature's most spectacular shows. Happy aurora hunting!
:max_bytes(150000):strip_icc()/277019-baked-pork-chops-with-cream-of-mushroom-soup-DDMFS-beauty-4x3-BG-7505-5762b731cf30447d9cbbbbbf387beafa.jpg)